Software:QNX4 demofloppy
QNX had several demonstration live floppy releases, including QNX4. It comes basically in two flavours: one with supporting some network cards, and another one with modem support. This test drive description is about the latter one, on ubuntu linux (14.04) host under official ubuntu 0.74* dosbox.
WARNING!
The included script and manual is dangerous. It needs sudo or root access to the target host, uses external dependencies, can cause damage and irrecoverable package dependency problems via apt installing, and may be harmful when you are not familiar with tcp/ip ipv4 networking or linux iptables/slattach/etc. tools.
Known limitations
- No mouse support, conjectured that QNX guest uses IRQ 12 for PS/2 mouse
- Supported resolution is 640x480 4bit by the guest with the emulated VGA cards
Prerequisities under ubuntu
Internet settings
- A working internet connection is essential
- 192.168.7.0/30 network must be unused! Otherwise network range collision will happen, causing unpredictable results!
- TCP ports 23 and 2323 should NOT be used by other application, and might collide with firewall settings if there is any!
QNX demo floppy image
Its checksum is:
$ md5sum qnxdemo.dat
8f8d0361fe9b600e94d6aa9aff382b7e  qnxdemo.dat
Some modem floppy versions might have different checksum (even if they are not corrupted)
Required ubuntu packages
And also the following packages needs to be installed:
$ dpkg -l | awk '/^ii *(iptables|ppp|socat|sudo)/{$1=$3=""; print tolower($0)}'
 iptables  amd64 administration tools for packet filtering and nat
 ppp  amd64 point-to-point protocol (ppp) - daemon
 pppconfig  all a text menu based utility for configuring ppp
 pppoeconf  all configures pppoe/adsl connections
 socat  amd64 multipurpose relay for bidirectional data transfer
 sudo  amd64 provide limited super user privileges to specific users
Install them with this command (usually needs root privileges)
$ apt-get install -y bash dosbox iptables ppp socat sudo
The all-in-one script: runme.sh
Run as root, like:
sudo ./runme.sh
This is a hybrid shellscript - dosbox config file.
#!/bin/sh
true <<REM
[dosbox]
memsize=32
machine=svga_et4000
[serial]
serial1=modem listenport:2323
[autoexec]
mount e .
e:
boot qnxdemo.dat
REM
########### this is the end of config file
########### here comes the real script
# by Peter Naszvadi, 2012-2016
#
# Press F1 in qnx whenever it is possible
# F2 needed only when confirming resolution
# enter localhost for number, password, username
# pap/chap is okay
# dns server is google 8.8.8.8
for i in grep dosbox iptables md5sum mktemp pppd sleep sudo whoami
do
which "$i" || { echo >&2 "Install '$i', it is necessary"; exit 1 ; }
done
whoami | grep -qxFe root || { echo >&2 'Run me as root!'; exit 1 ; }
echo 8f8d0361fe9b600e94d6aa9aff382b7e qnxdemo.dat | md5sum -c - || \
    { echo >&2 'floppy image md5sum is BAD!'; exit 1 ; }
MY_UID="$(find "$0" -printf '%U' -quit)"
sudo -u "#$MY_UID" nohup dosbox -conf "$0" &
BG_PID="$!"
SERIAL_FILE="$(mktemp -u /dev/serialXXXXX)"
grep -Fq 1 /proc/sys/net/ipv4/ip_forward || \
    { echo 1 1>/proc/sys/net/ipv4/ip_forward ; }
iptables -L -t nat | grep '^MASQ.*192\.168\.7\.0/30' || \
    iptables -t nat -A POSTROUTING -s 192.168.7.0/30 -j MASQUERADE
while ps $BG_PID >/dev/null
do
    if sleep 0.1 && pgrep socat
    then
        echo Socat is already running...
    else
        socat TCP4-LISTEN:23 PTY,link="${SERIAL_FILE}" &
        BG_PID2="$!"
    fi
    sleep 0.5
    if pgrep pppd
    then
        echo pppd is running...
        sleep 1
    else
        pppd "${SERIAL_FILE##*/}" defaultroute mtu 576 192.168.7.1:192.168.7.2
    fi
done
echo dosbox exited
kill -9 "$BG_PID2"
pkill -9 -f 'pppd.*192.168.7.1:192.168.7.2'
test -e "$SERIAL_FILE" && rm "$SERIAL_FILE"
exit 0
Booting and configuring a session
Note that all settings will be lost after VM shutdown! It is a live system, altered settings could not be saved.
Only keyboard can be used, no mouse, so golden rules:
- F1 key should be pressed if there is a choice or pressing key is needed
- F2 needs to be pressed only when there is the video/resolution setting window. F2 means "done"
- Focus can be switched between graphical input fields by pressing TAB as many times as needed
- ENTER presses the focused button
- Cursor keys, CONTROL+ESC can navigate in or pop up start menu at GUI
- localhost is the only text to type as password, dial number etc.
- 8.8.8.8 g**gle DNS is used, so type it in the applicable window via pressing 8-[TAB]-8-[TAB]-8-[TAB]-8[TAB]
- Some TABs and PgUP/PgDN can scroll in web browser
Selected screenshots in chronological order
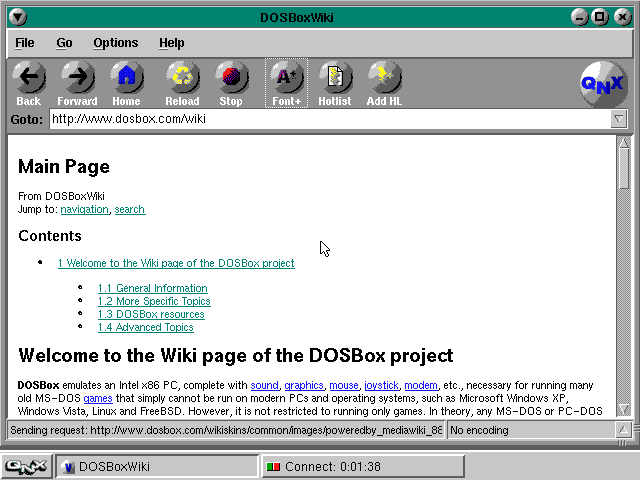
What is deserved by the DOSBox community and the (non)believers is this final screenshot:
Screenshots from beginning to end in one huge file:

